
When my new sister-in-law Margeaux told me her wedding theme was going to be Burlap and Lace, I knew I had a huge opportunity to get crafty for her bridal shower. I hit up Pinterest and couldn’t believe how many Burlap and Lace ideas were out there.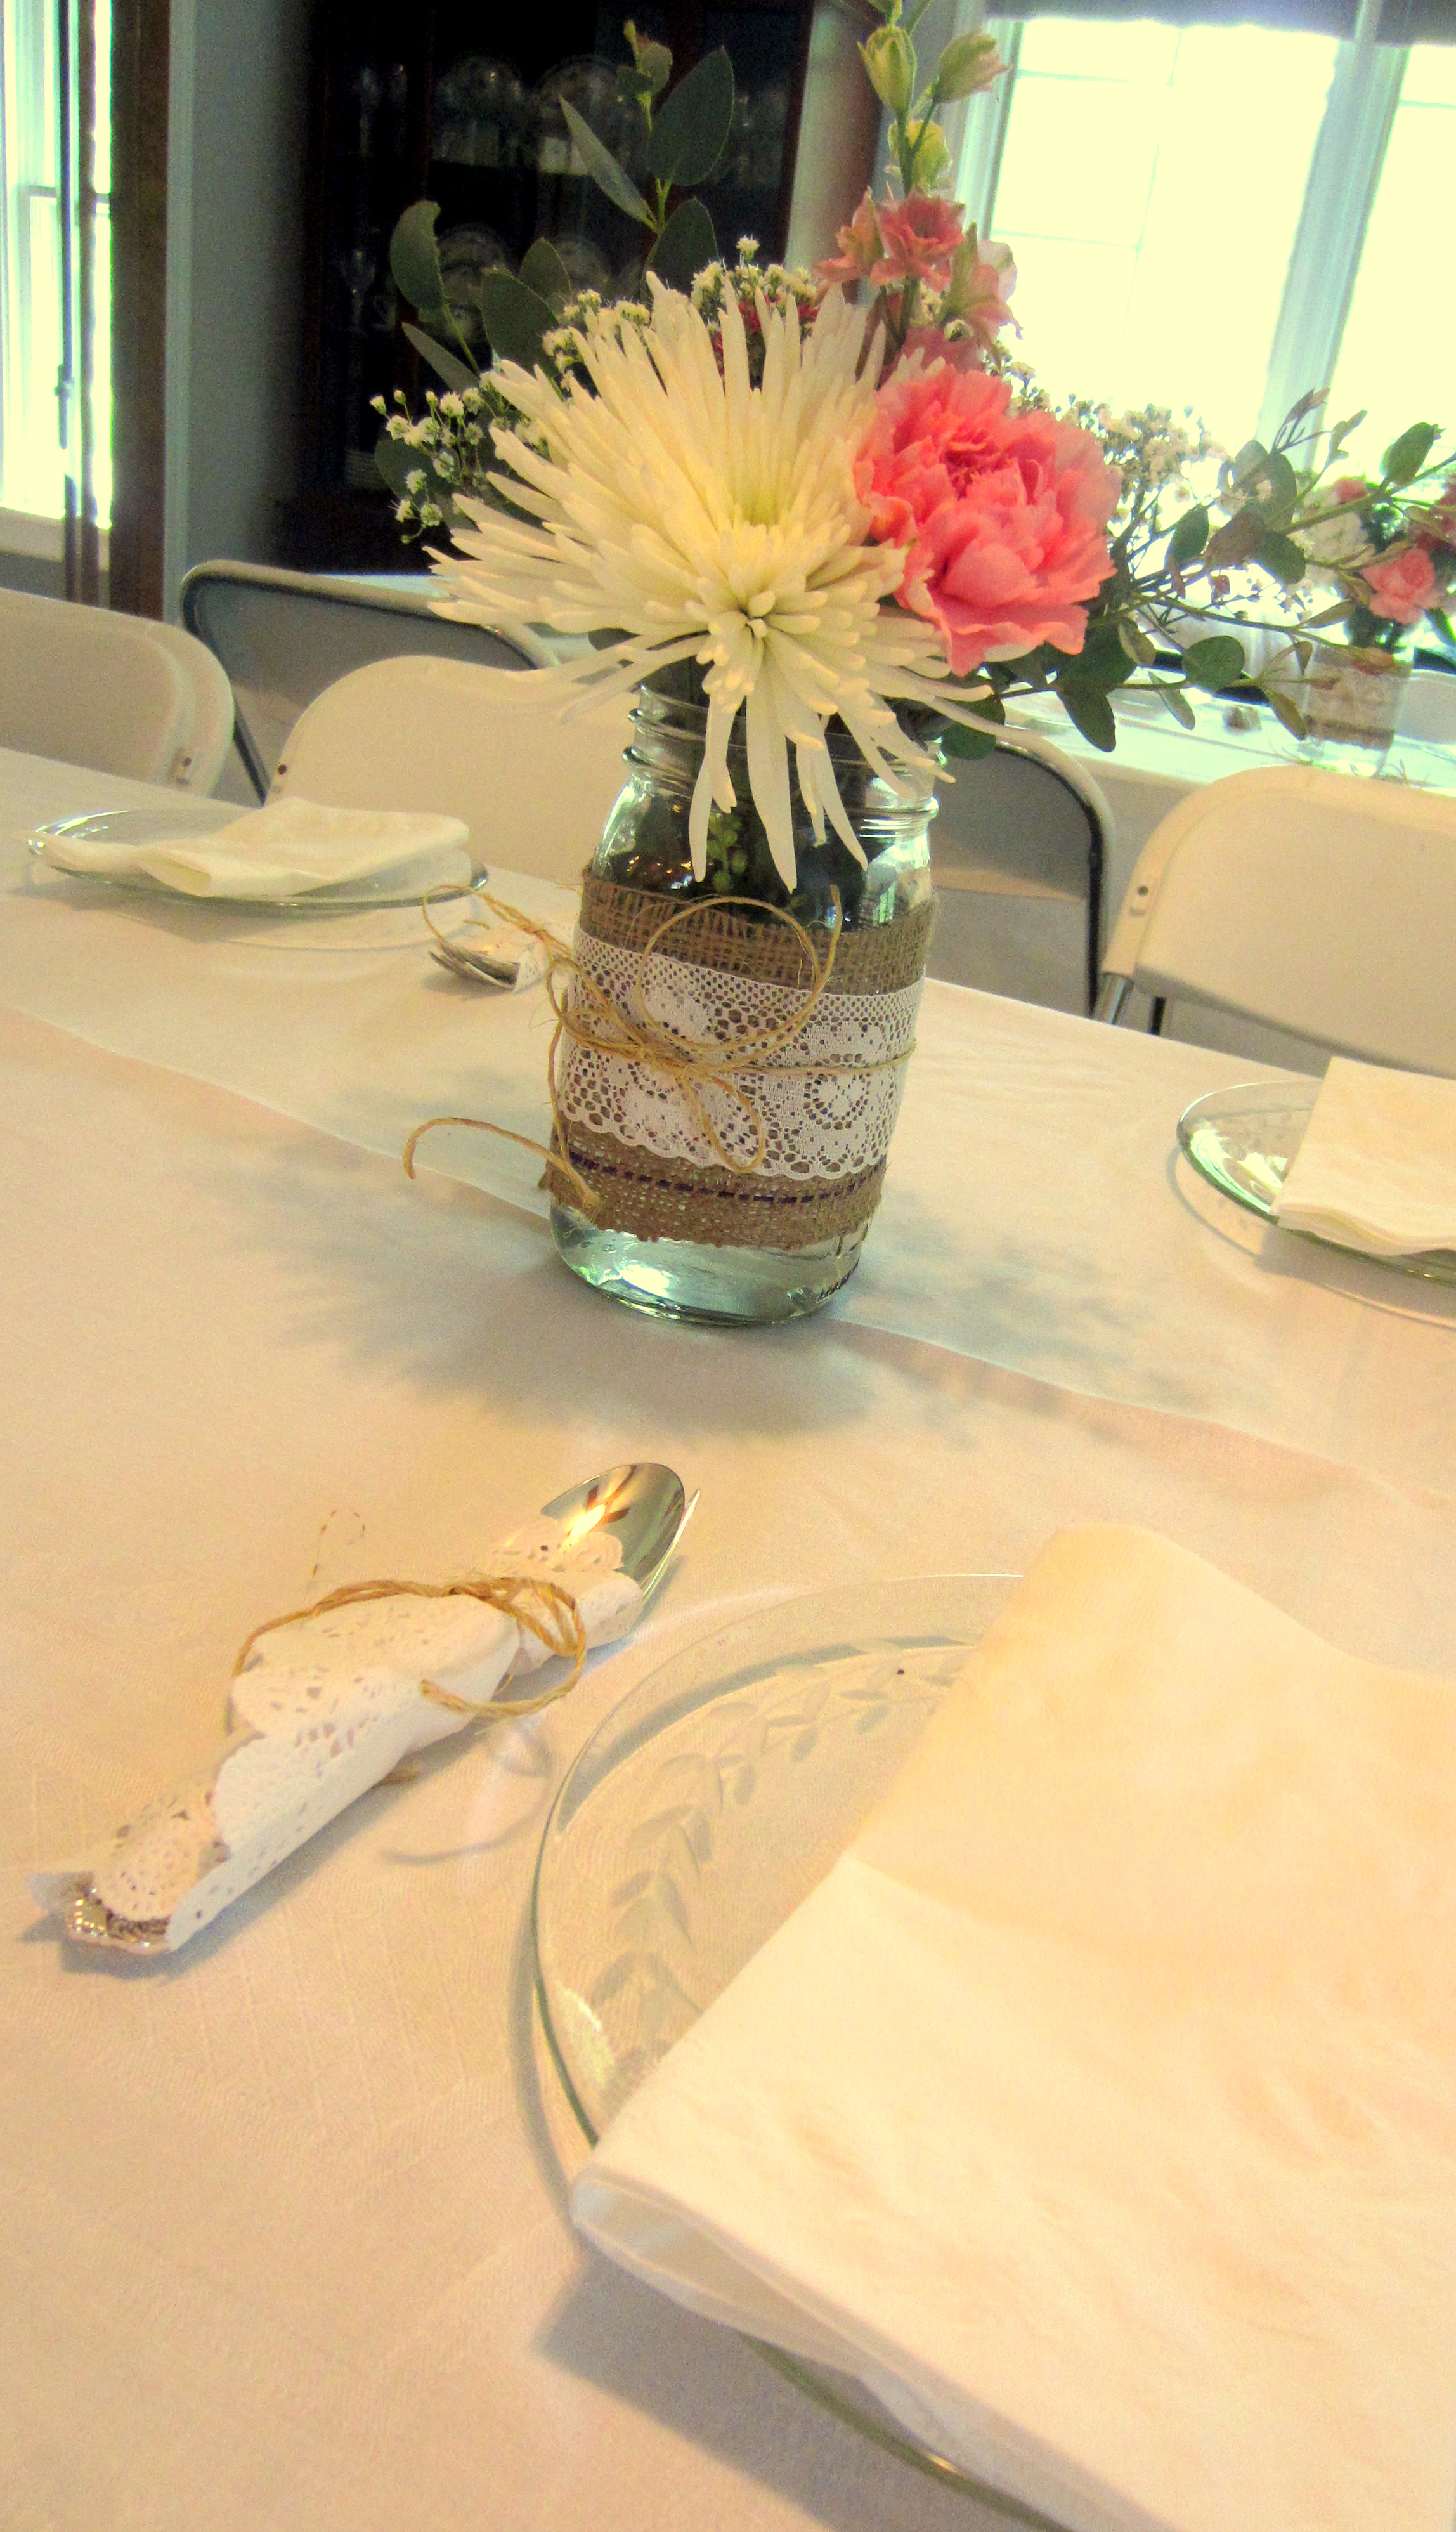
Though why I was surprised, I don’t know. It’s such a lovely combination. Dainty yet rustic. Country and classy. Graceful with rough edges. Love it!
So I went to town. I took ideas from Pinterest and then made them my own to fit the shower that my mom and I threw at the end of May. Maybe something here will spark some ideas for you too!
This post describes each project I made in detail, with a number of links to the materials I used. The links are mostly Amazon affiliate links, so if you click on one and make a purchase, a small percentage goes to my blog. I figured seeing exactly what I used would be helpful, so hopefully you’ll see it that way too.
If you aren’t interested in the details, you can always scroll down to the bottom of the post and read my “Trying to Enjoy with Toddlers” section for more of a personal tidbit.

Project 1: The Bride-To-Be Sash
Definitely the most time consuming of the bunch, this sash was made primarily with burlap, lace, and muslin as a backing (because it would have been awfully itchy otherwise). How you attach the pieces is up to you, but I cheated with a No Sew Glue. I’ve also read that Stitch Witchery
works great for this sort of thing as well.
I honestly had no idea how long to make it, so I draped a measuring tape over myself, figured out where I wanted it to rest, and then shortened it a little because Margeaux is pretty darn petite.

Margeaux gave me a big roll of 3-inch wide burlap that I think she got from a wholesaler or a garden store or something along those lines. The closest thing I can find to it is this Burlap Roll, but the latter might be a little less industrial, so that would be a good thing.
I cut the size of burlap I wanted and then put Fray Check along the edges so that it wouldn’t unravel. That was a pretty important step because real burlap unravels very easily.
While I let the Fray Check dry, I printed out the lettering I wanted to use. I simply chose a font on the computer, made sure the letters were the size I wanted to use, then printed it out. Then I put the printed paper under the burlap, and carefully drew the letters onto the burlap using an oil-based, medium point, Paint Sharpie. Because the burlap had such a wide weave, I was able to see through it to the lettering, which helped a lot.
To make the backing (or lining…however you want to look at it), I pulled out some inexpensive muslin I keep for reenacting mock-ups. I cut a piece that was the same size as the burlap, but I gave myself about ½ an inch seam allowance on all sides. I folded the seam allowances over and pressed it with an iron. I guess I didn’t technically need seem allowances, since I wasn’t actually sewing anything, but they gave the end product a nice, finished look and made the sash appear sewn, rather than glued.
I purchased 12 yards of 2-Inch Creative White Lace and between this project, the gift banner, the mason flower jars, and the recipe box, I used the whole thing. To put the lace on the sash, I spread the muslin out and pinned the lace along it’s edges, folding it carefully at the corners. Then I glued the muslin and lace together (taking out the pins as I went) with the No Sew Glue. After that dried, I placed the burlap on the lace and muslin and glued it down as well.
I guessed where I wanted the two sides to come together at the hip, and tacked them together using big stitches. I wanted to be able to undo the stitches and re-tack it easily if it fell funny on Margeaux, but it turned out fine.
As a finishing touch, I sewed on a Canvas Corp Burlap Flower and I really think that piece made the project complete.
♥
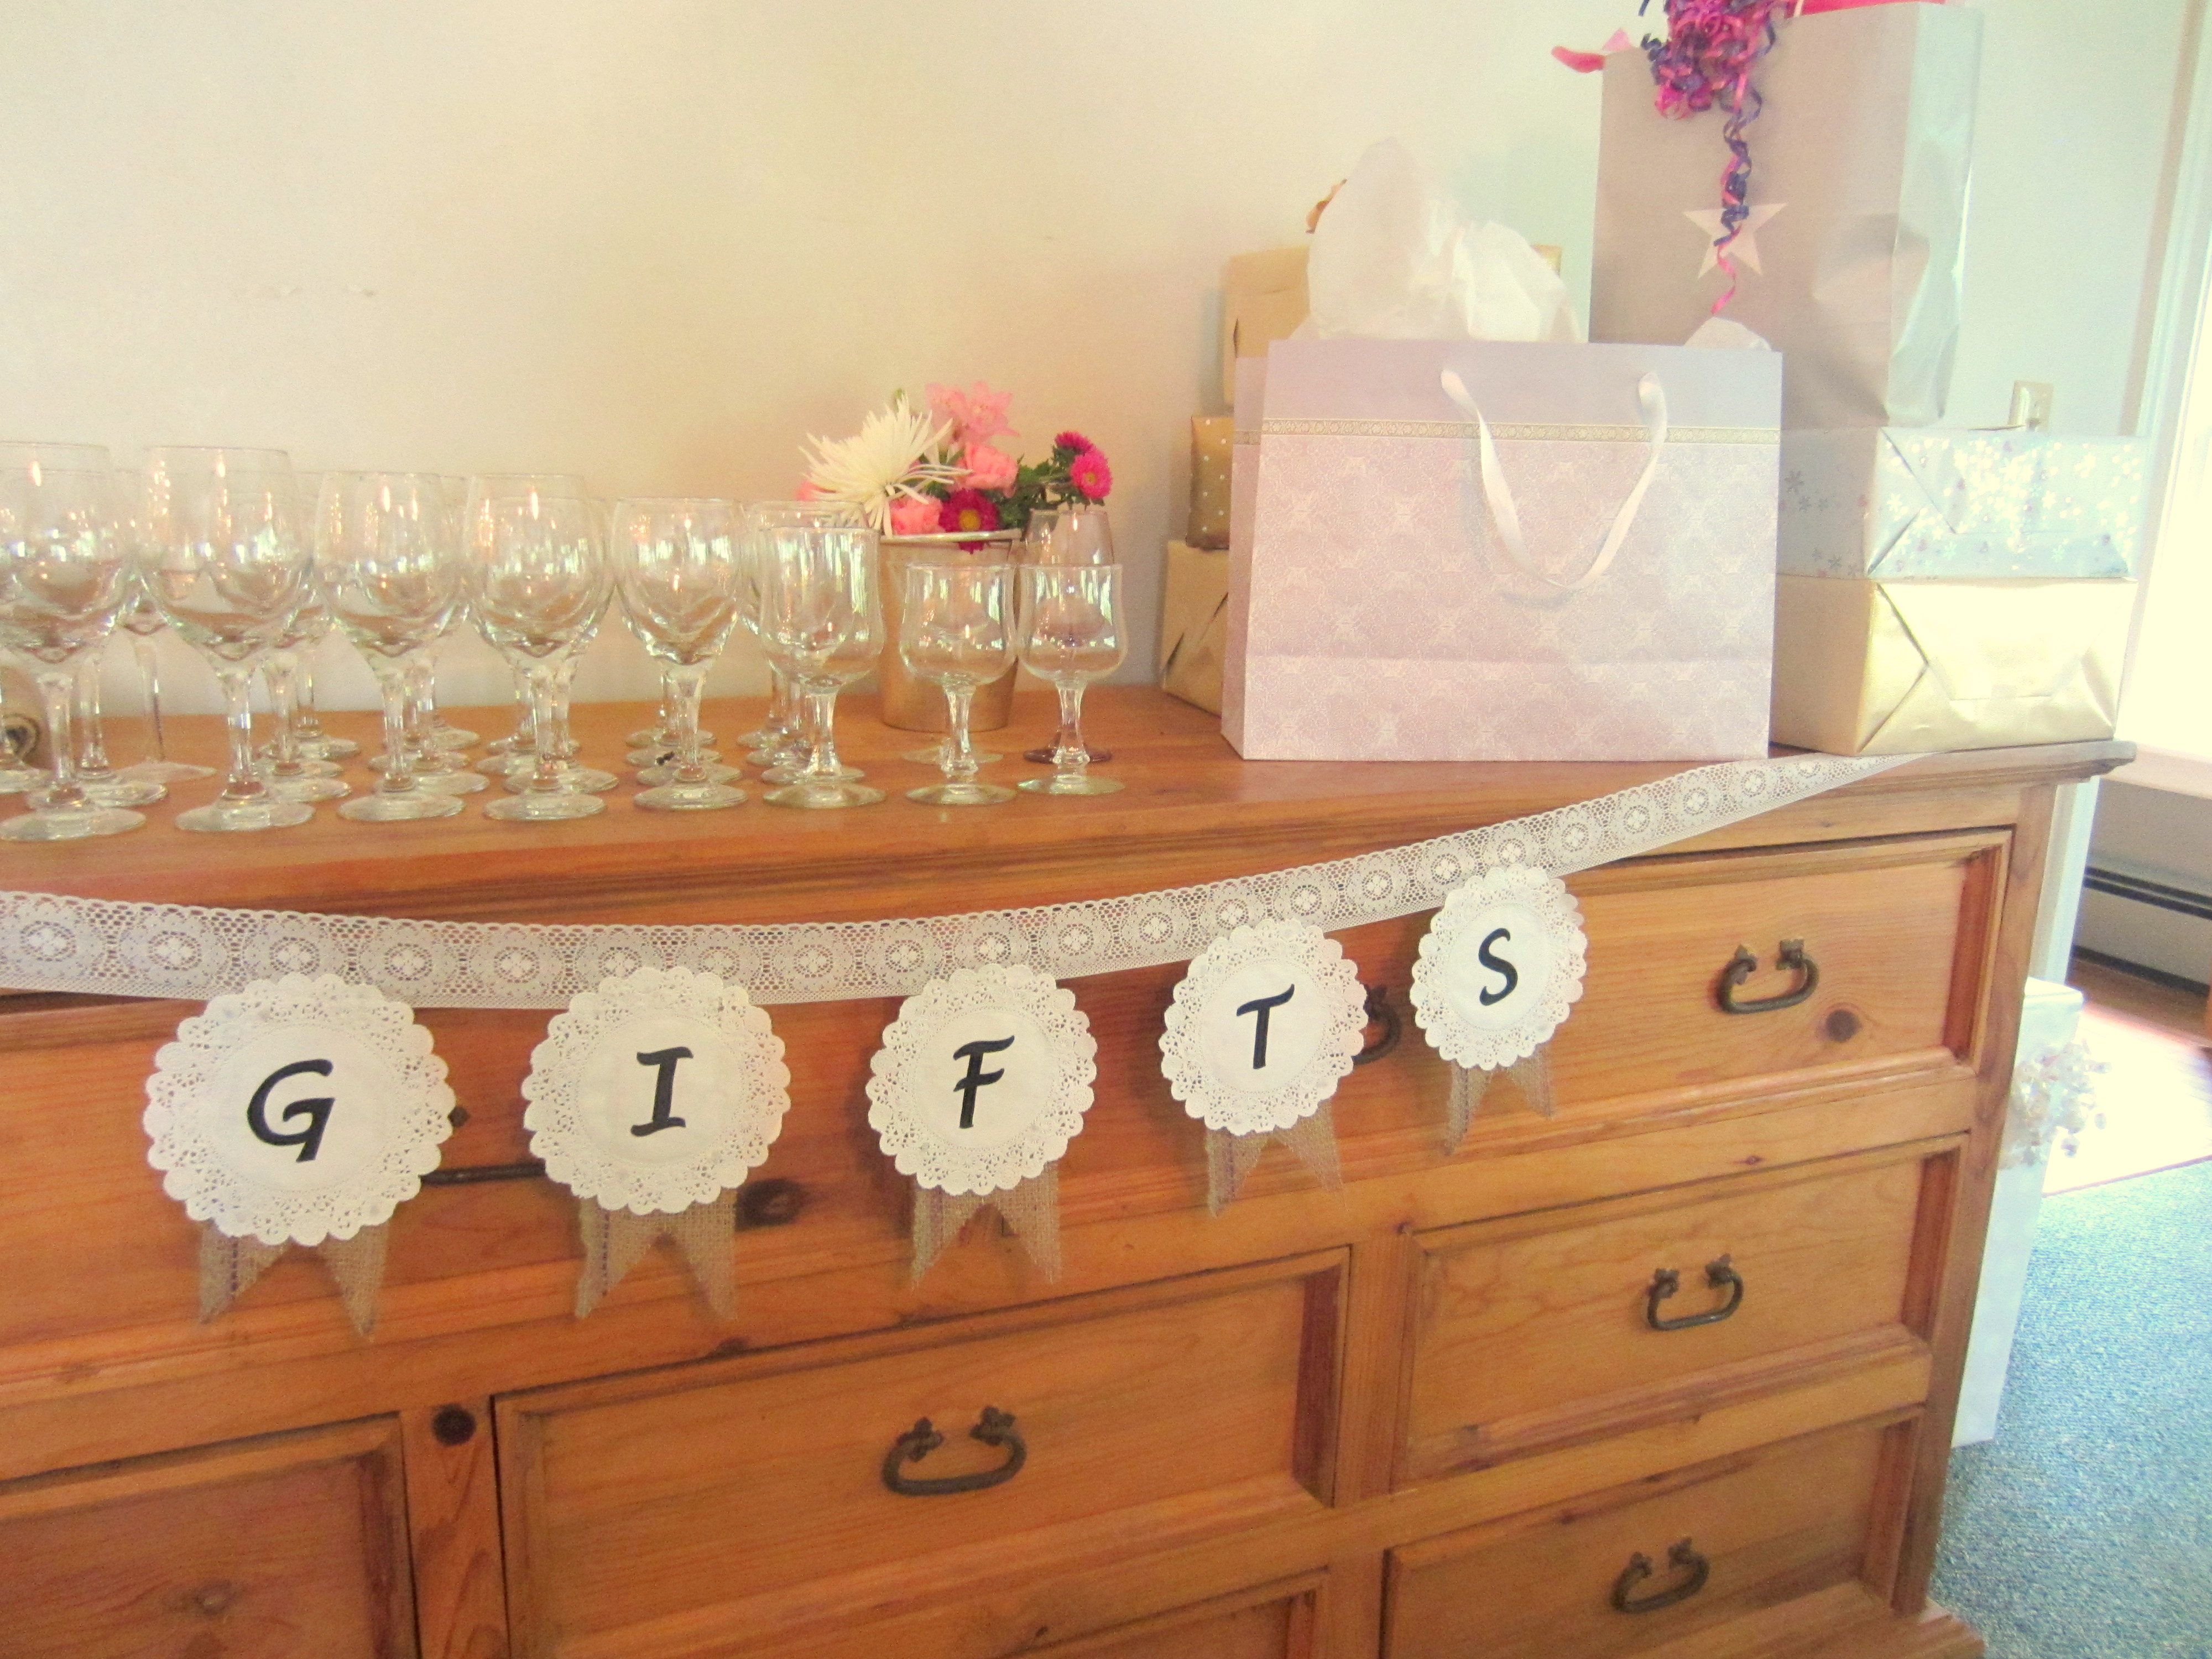 Project 2: The Gift Banner
This banner looks a bit quicker to make than it actually was, but then, I do have two toddlers now (does a 1-year-old count as a toddler or a baby? Not sure…either way). But I didn’t want it to fall apart so I spent time on the little details. I’m glad I did because Margeaux reused it at her wedding for her gift table.
Meaning, she liked it. Yay!
I started by cutting rectangle pieces of burlap from the roll of 3-inch wide burlap Margeaux gave me that I mentioned previously. Then I cut triangles out of one end of the rectangles, and used my Fray Check along all the burlap edges to make sure the burlap didn’t unravel and fall apart.
Just like the sash, I printed out the letters I wanted to use on regular computer paper, then traced them onto 6-Inch Round Paper Doilies. I literally just placed the doily over the printed page, and since I could see through the doily fairly well, I was able to draw the letters easily. I used my oil based, medium point, Paint Sharpie
, but I feel like any decent black marker would have worked just as well.
I used a large strand of my 2-Inch Creative White Lace to make the banner string, and that tied everything together. No pun intended. 🙂
I attached it all by gluing the burlap pieces to one side of the lace with the No Sew Glue, and then gluing the paper doilies to the other side of the lace, and subsequently the burlap, using a Krazy Glue Pen
. I did have to be careful not to let the glue from the glue pen pool, because that would be easy to see through the doily paper.
I appreciated the light weight of the banner because we were able to drape it easily. We could have tied it, I suppose, because we had enough lace, but that really wasn’t necessary at either the shower or the wedding.
♥
 Project 3: The Mason Flower Jars
These jars could be used for all sorts of things, but we used them as flower vases. We might have used them to hold silverware or granola for the yogurt bar, but honestly, we had so many flowers that we filled all of these.
The flowers were professionally put together because the woman doing them (I believe her name was Amy) wanted a trial run for Margeaux’s wedding centerpieces. My mom had Amy bring the centerpieces over the morning of the shower, and we just plucked the flowers out and put them in the jars. Personally, I thought that was a rather expensive way of doing things, but it did turn out lovely, and this ensured that the centerpieces at the wedding were exactly the way Margeaux wanted them.
 We used a pack of Ball Wide Mouth Quart (32 oz) Jars with Lids and Bands
. I measured the circumference of the jars, then cut 12 pieces of burlap so that they would wrap around the jars and overlap just a little. Once again, I used Fray Check
on the edges of the burlap so that it wouldn’t unravel.
Then I cut 12 pieces of my remaining 2-Inch Creative White Lace in strips just about an inch longer than the burlap. I used a diagonal cut for appearance purposes.
My mom lent me her glue gun, which wasn’t necessary but really cut down on the amount of time needed to put these together. I did put a lot of glue on these, probably more than was necessary. I’m sure any relatively strong glue would work.
I put the hot glue straight on the jar, then wrapped the burlap around the center of it. Then I put the hot glue on the burlap and wrapped the lace around that, making sure to overlap it in the front for a decorative touch.
To finish the jar off, I tied a piece of Sisal Twine around the lace, making a bow with extra long ties. Admittedly, I glued that where I made the knot too.
♥
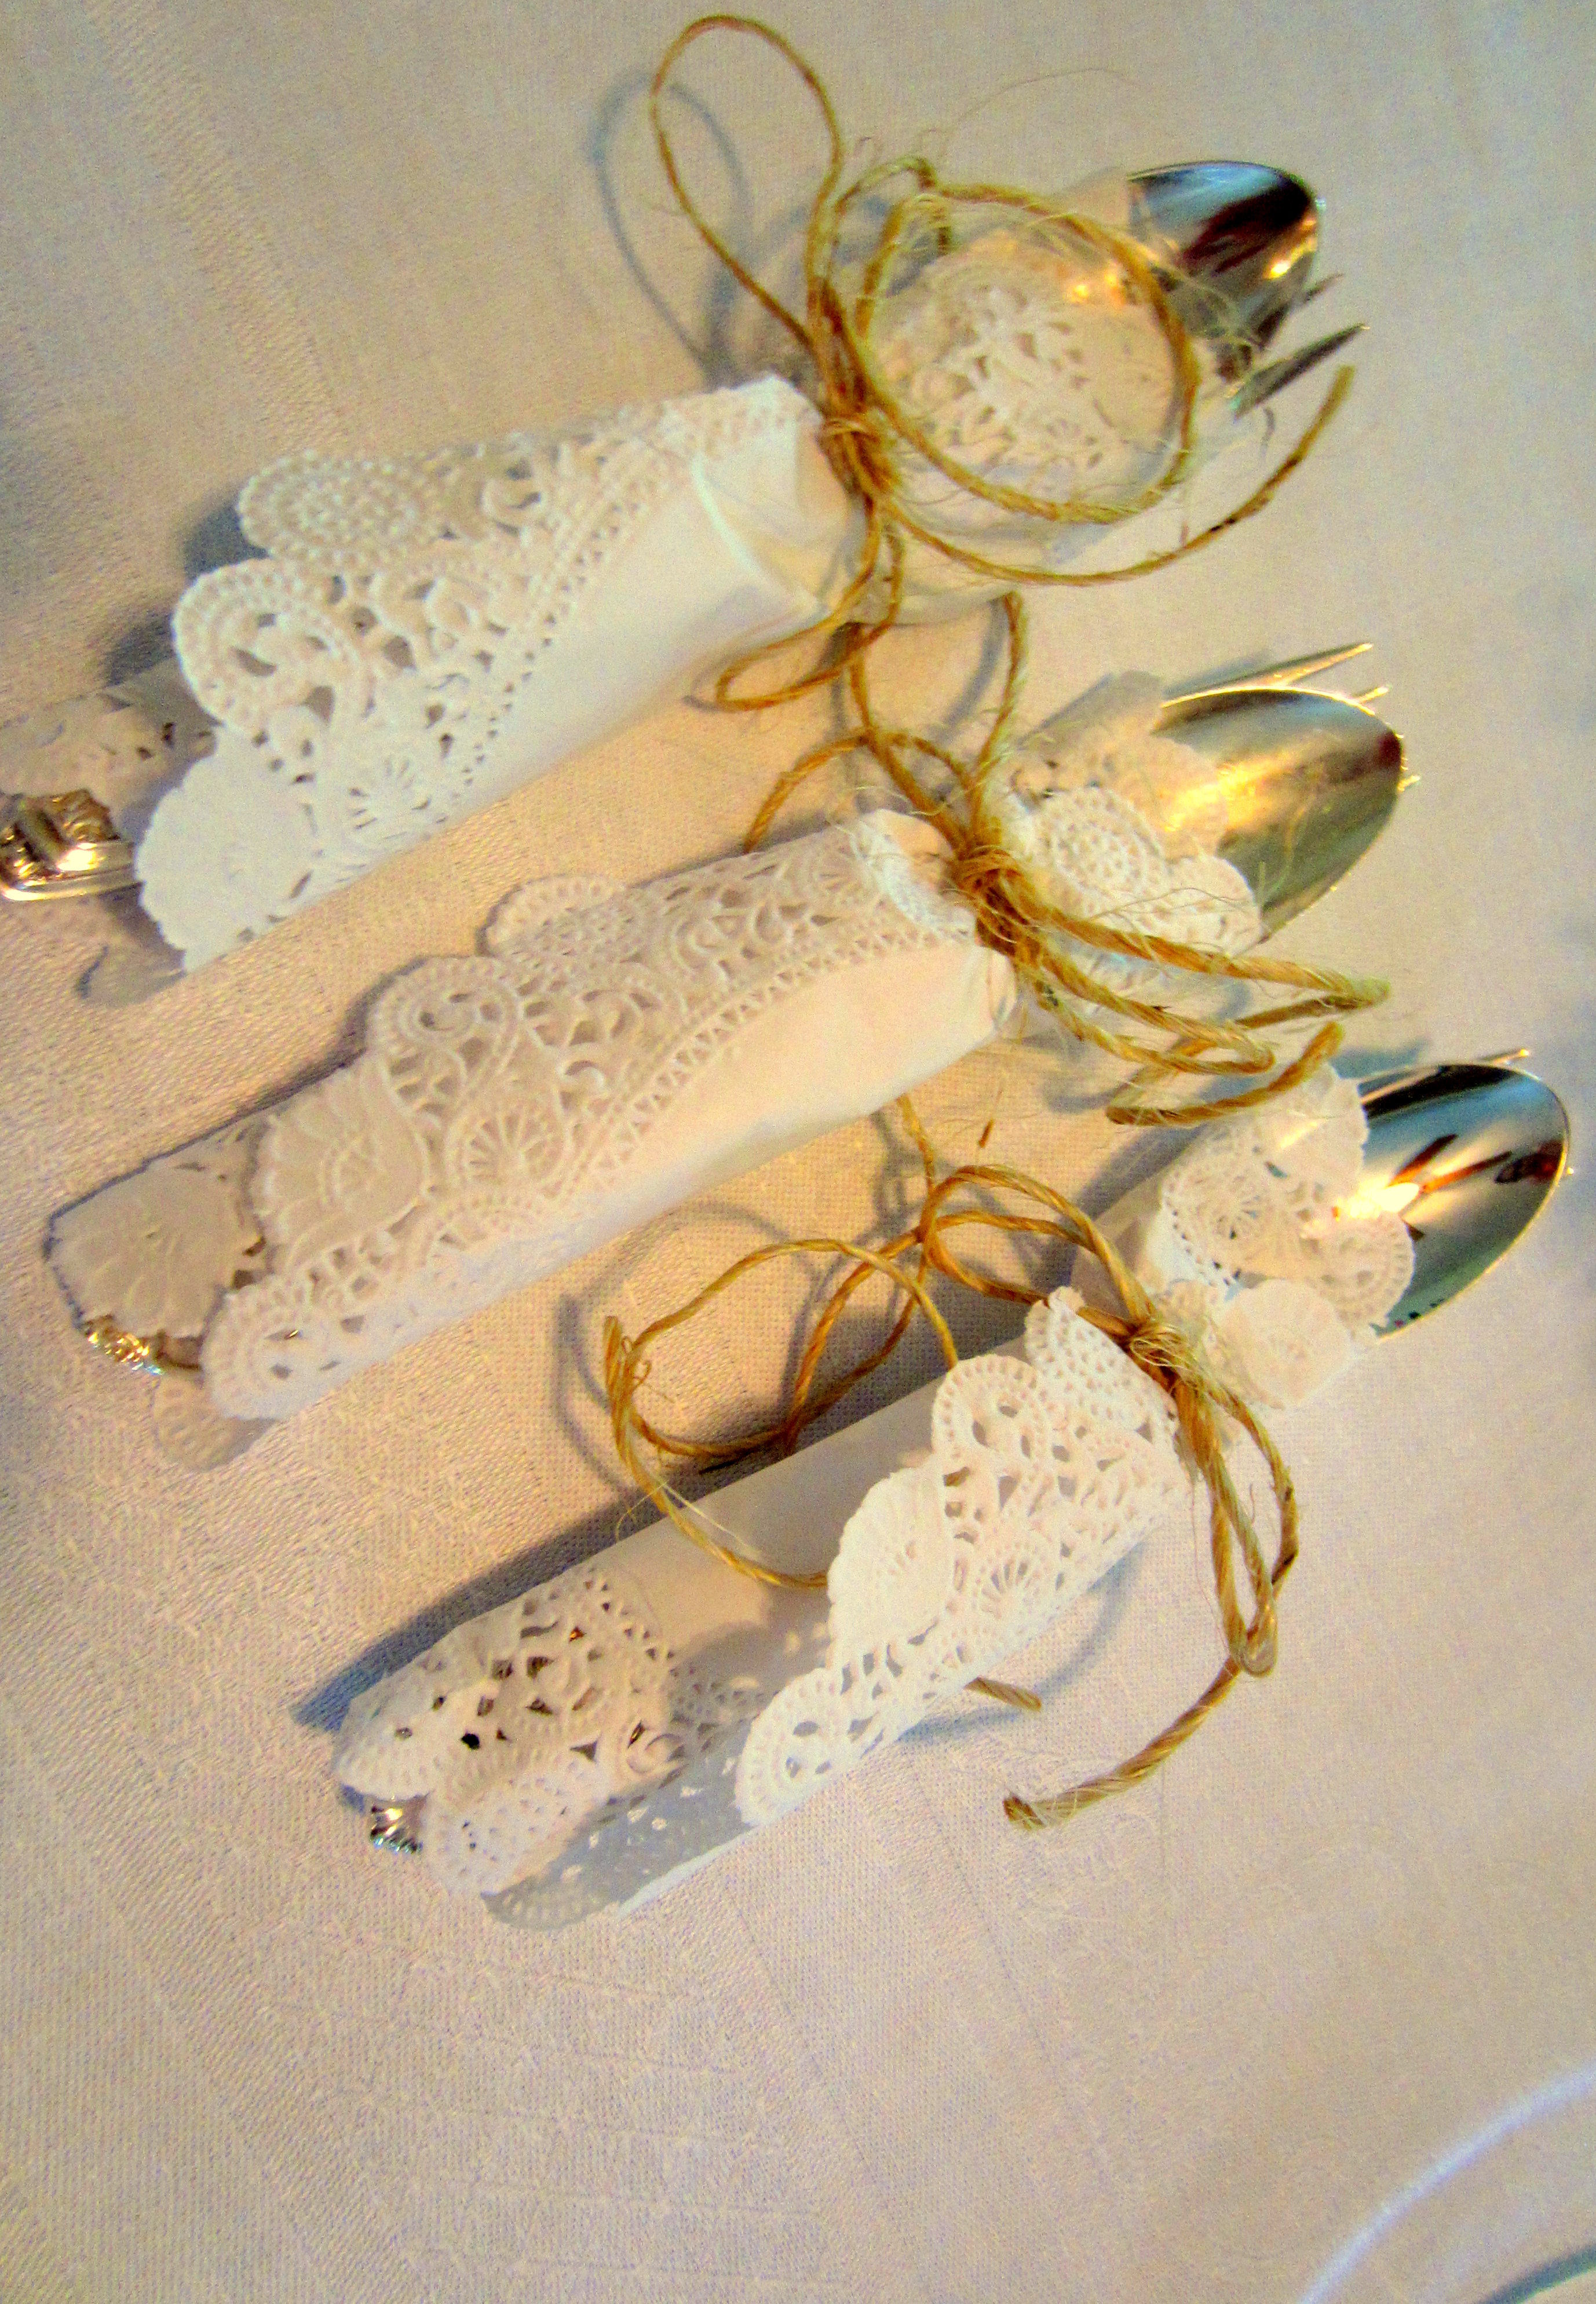 Project 4: The Wrapped Silverware
This was the simplest project I did, but sometimes it’s the littlest things that count. My mom borrowed a number of silver sets from friends and relatives and dropped them off at my house. It really didn’t matter that each set didn’t match, just as long as the spoon matched the fork in each wrap. We skipped the knives because they weren’t necessary for what we were serving, and that may have made these a little clunky.
I simply took my 6-Inch Round Paper Doilies and my Sisal Twine
and wrapped each fork and spoon pair. I made sure to leave a lot of extra twine after tying the bow, and I think that did the trick.
♥
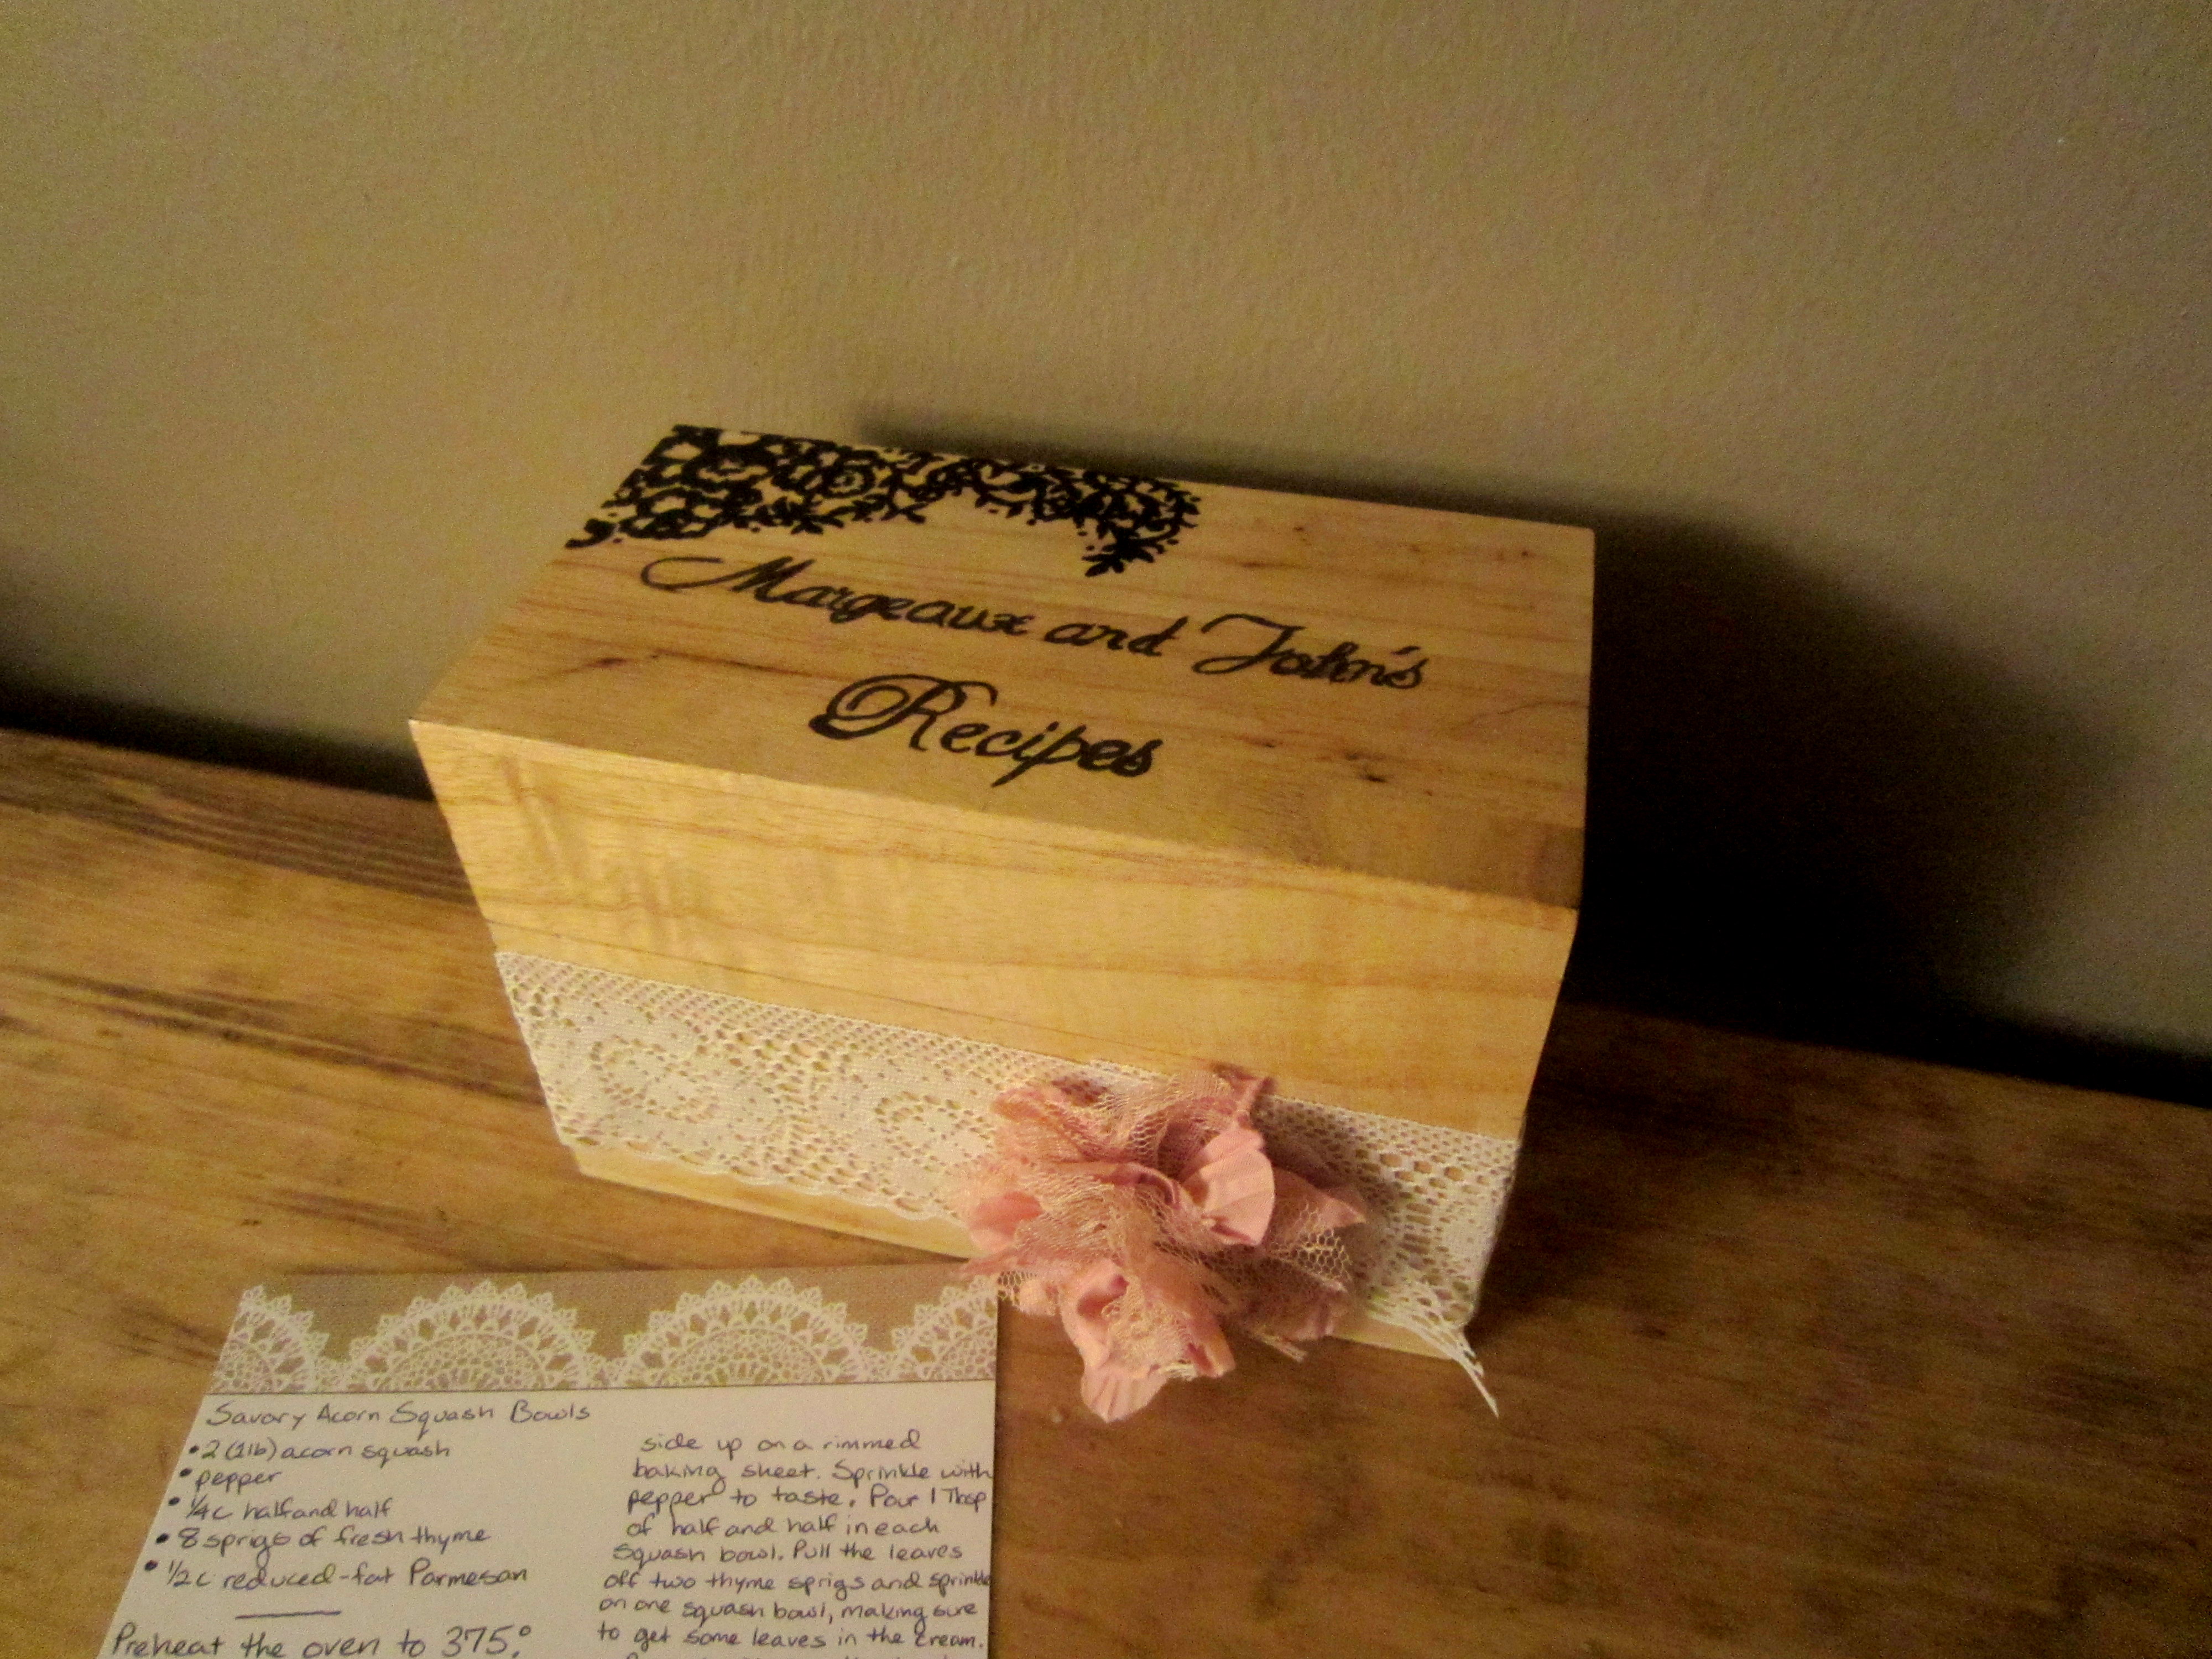
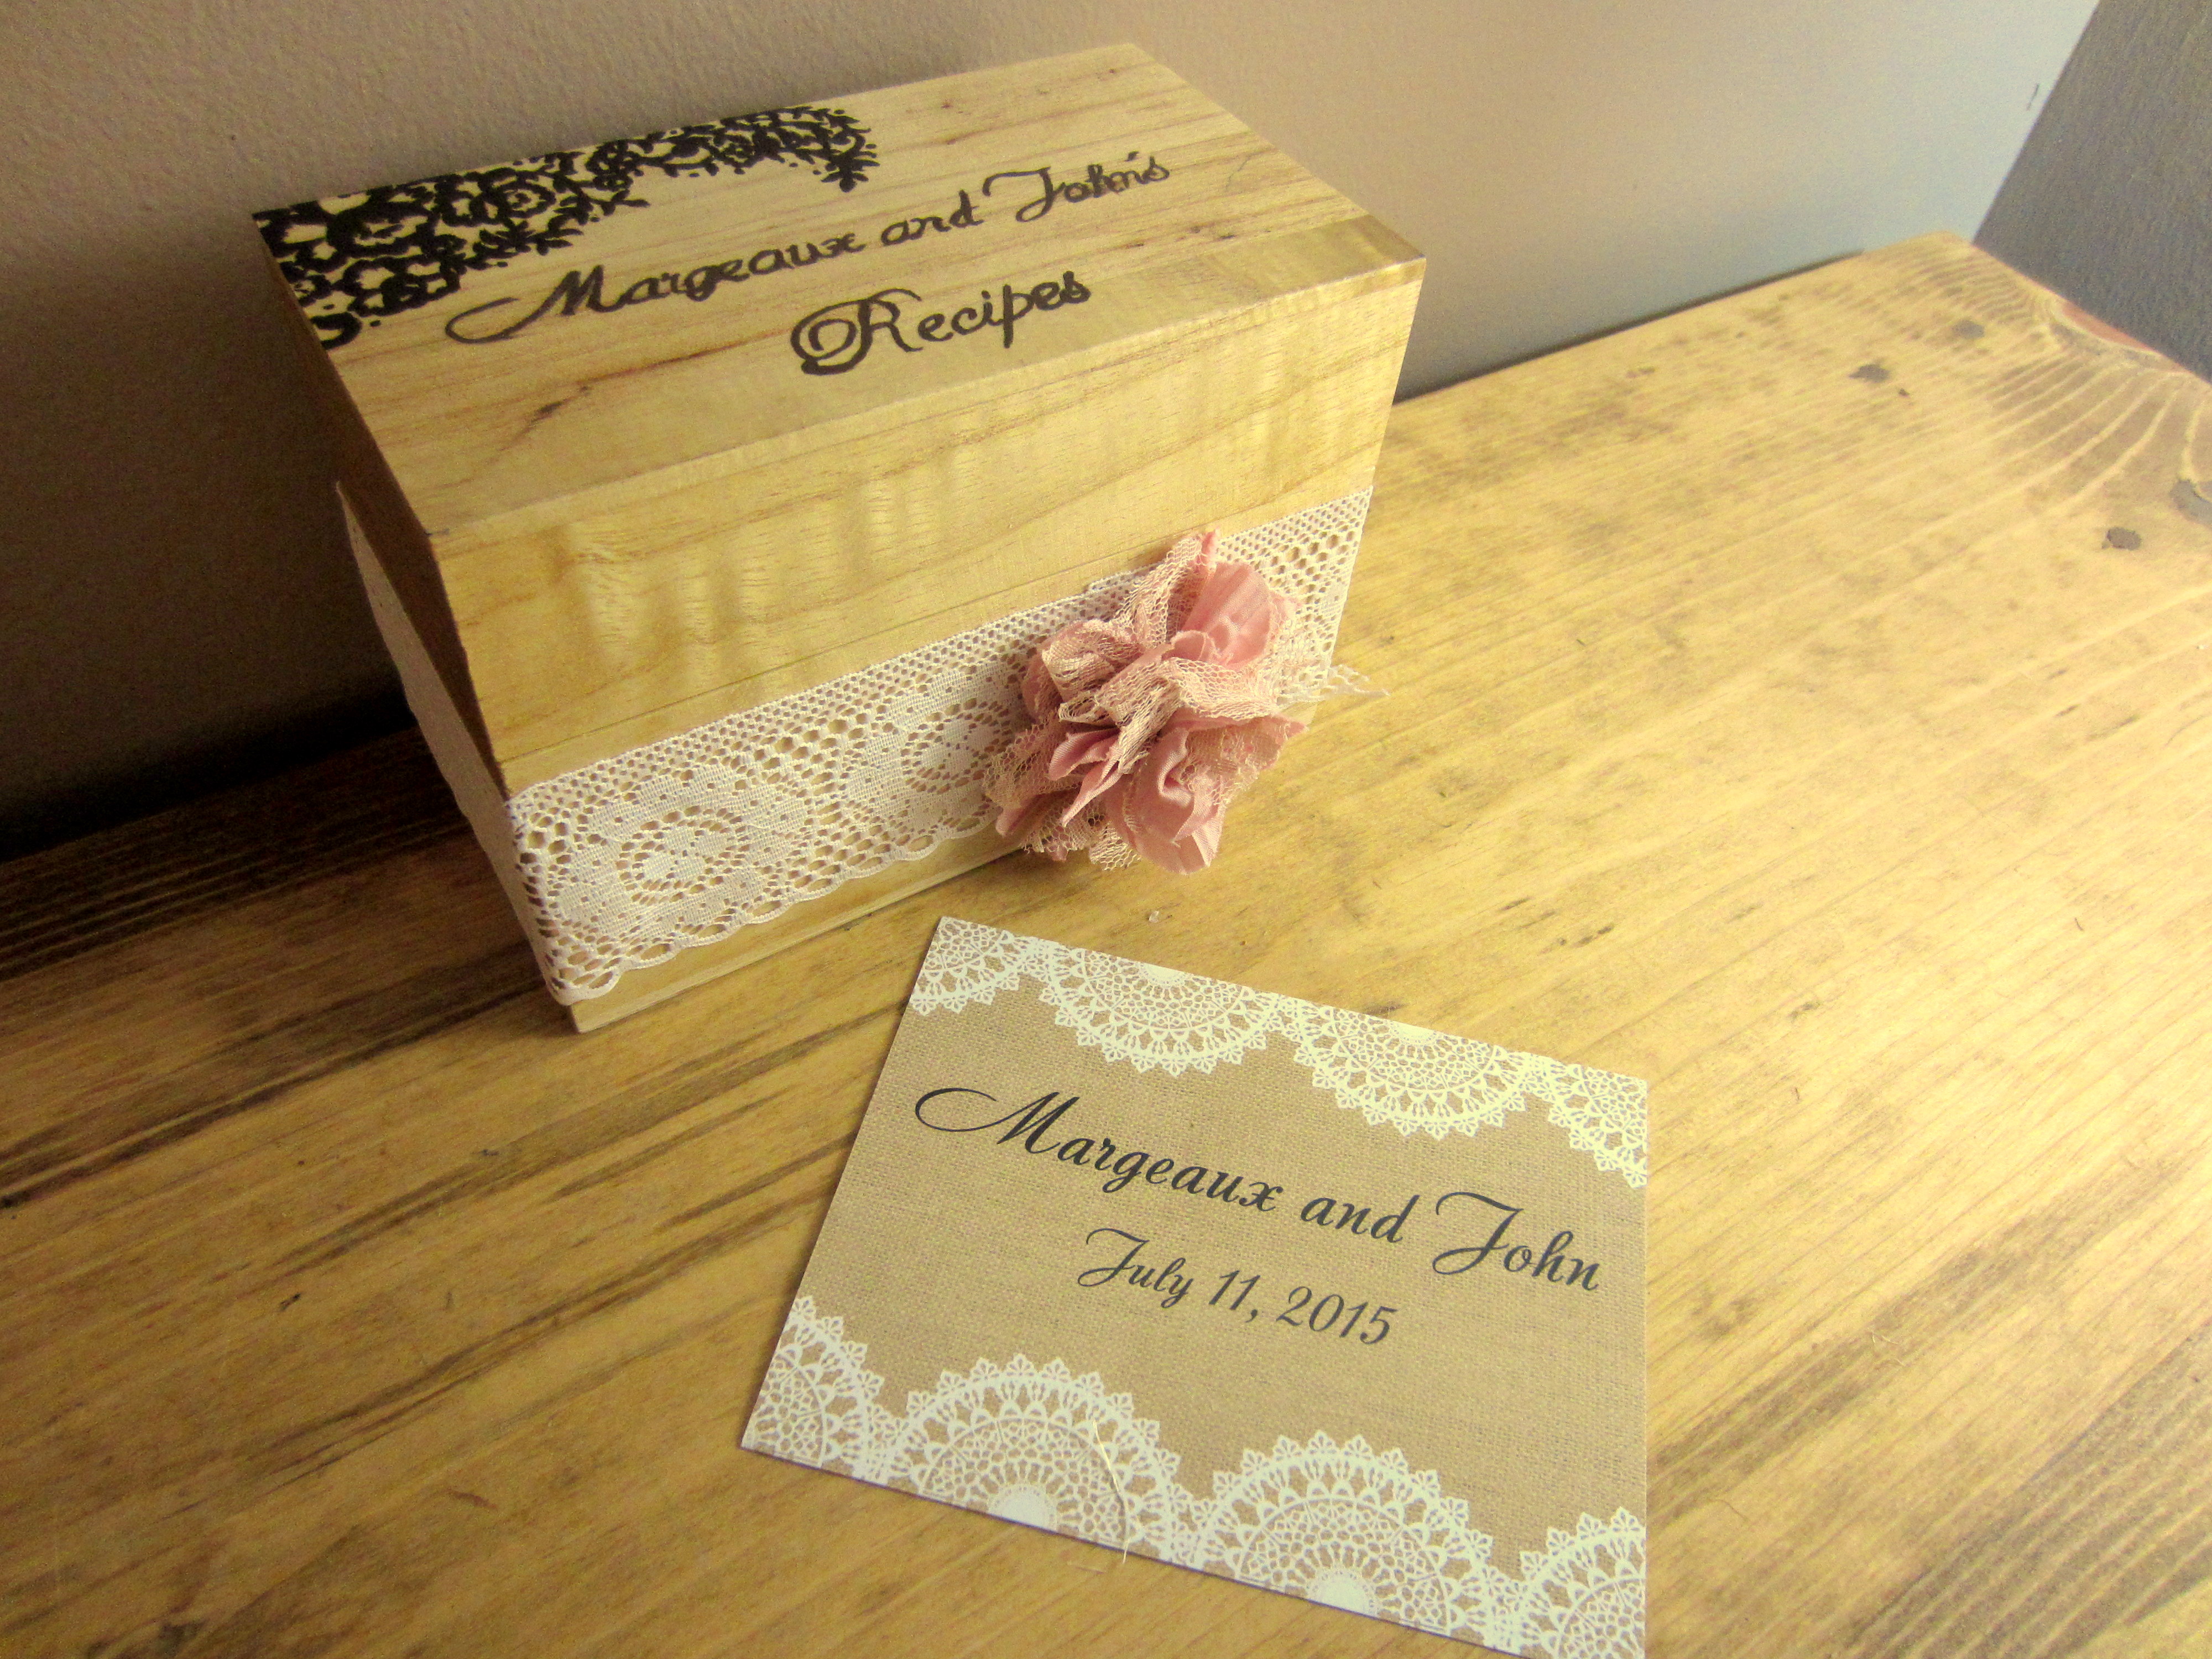 Project 5: The Recipe Box
I’m going to have a hard time telling you how to make a recipe box since I painted it with oils, but I’ll do my best to give you a few tricks that I used.
I started out with a plain Wood Recipe Box meant for this sort of thing. I wanted the box to match the invitations and recipe cards that I put together on Vista Print, so I took both and, using my Tracing Artist Pack
, I traced out the lace and the lettering. I transferred the tracing to the box using the graphite paper from the pack and then made it all meld together to the best of my ability.
I used a shade combination of Burnt Umber and Titanium White (I stick to Daler Rowney Georgian Oils…if you’re interested, click here for an awesome 10 pack to start out with, though it has Burnt Sienna rather than Burnt Umber).
When the oil paint dried, I sprayed the whole box down with a Polyurethane Oil-Based Spray (I used the satin finish). I think I used about three coats, but I don’t remember exactly. I propped it up on cardboard boxes in the garage and just ran in there every so often to spray it, making sure to get all sides, including the interior.
Once the finish was…finished, I wrapped a length of 2-Inch Creative White Lace around the box, overlapping slightly, and glued it with my Krazy Glue Pen
. The last piece to add was a pink lace flower, which I purchased at Meijer in the craft section. Actually, it came in a two pack, so I’m turning the second flower into a hair clip for Ginny and I to share. The flower had an adhesive on it already, but I glued it onto the lace anyway, making sure to get the glue between the lace strands and onto the wood. I didn’t want the flower hanging off the lace. I wanted it nice and secure.
 Mom and I found a couple of add-ons that I gave Margeaux for her shower gift, along with the recipe box. This included a Recipe Card Divider Set
 and an extra 48 card set of Burlap and Lace Recipe Cards
. The extra recipe cards didn’t match the original ones I sent with the invitations exactly, but this way, Margeaux can add her own recipes in the future. Also, not everyone remembered their original cards at the shower, or lost/misplaced theirs. We were able to hand out some of these extras, so I was happy to have them at the ready. Hopefully those guests will get them back to her later on down the road. I’m confident at least some of them will.
We also gave Margeaux a pack of Thank You cards. My sister received the same from the hostess of one of her showers, and we really liked the idea. It’s a nice touch, and hey, anything you can do to make the bride’s job easier, right?
♥
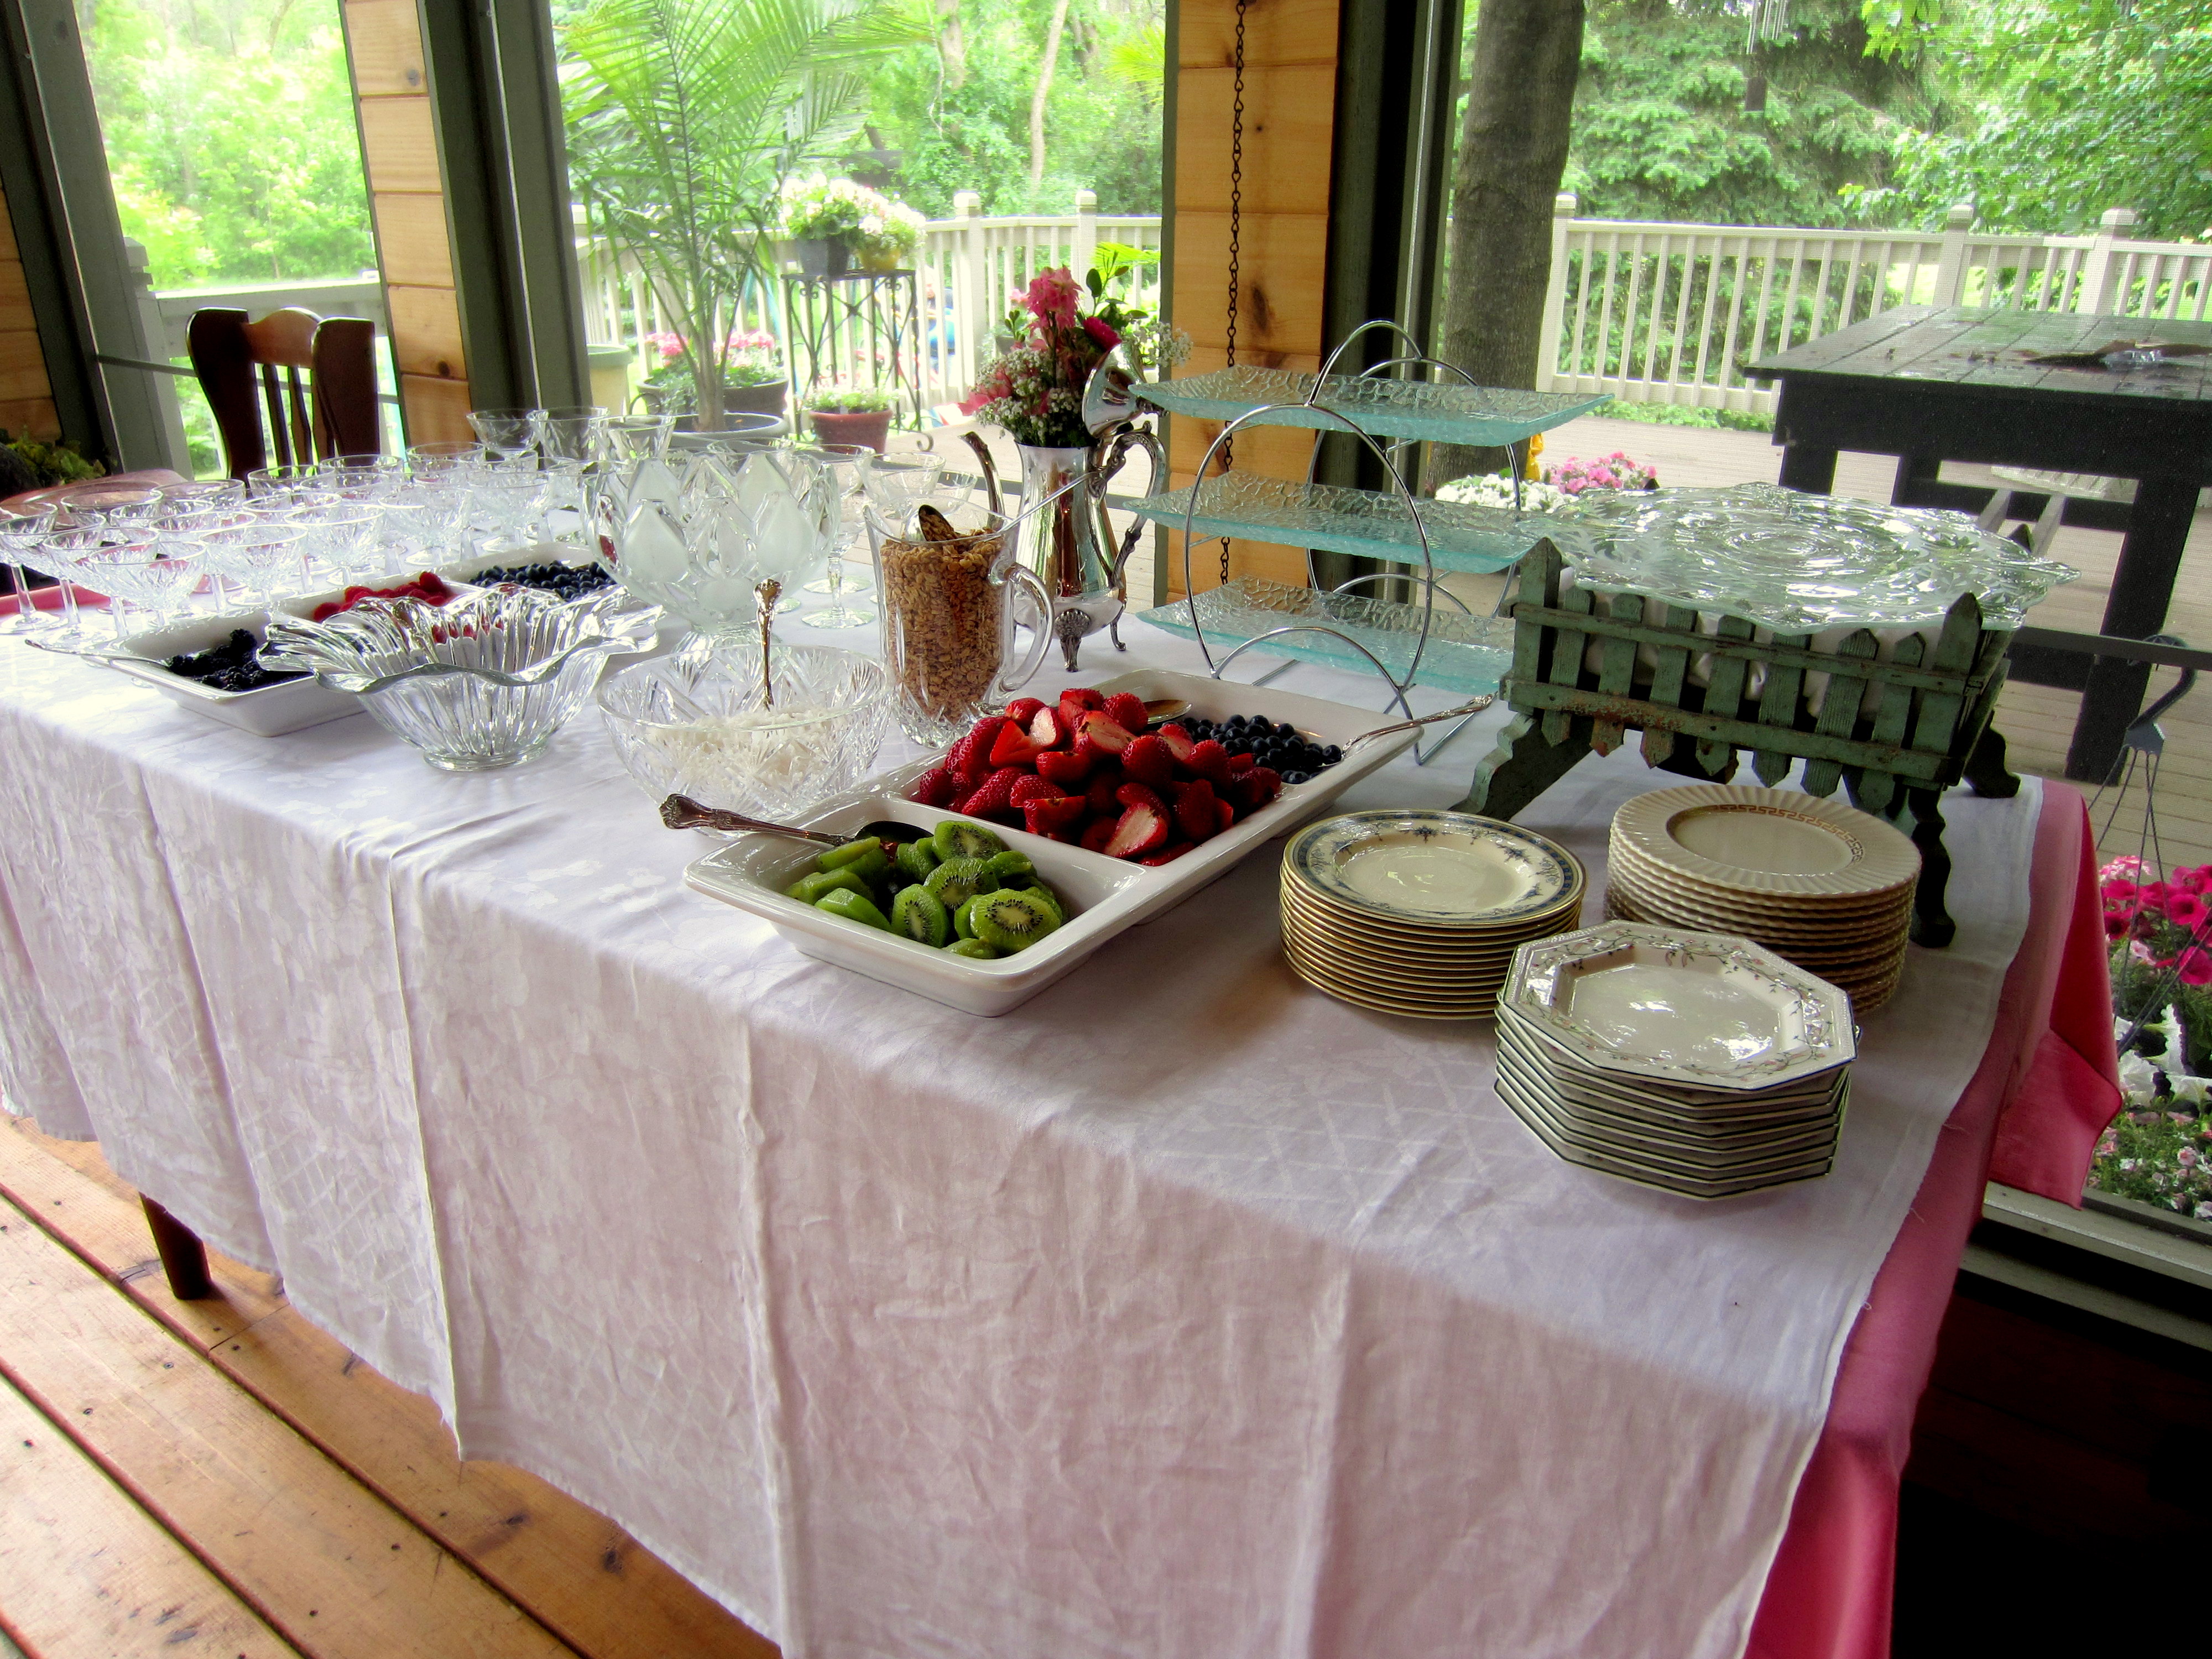 Project 6: The Yogurt Bar
This wasn’t so much a project as it was an addition to the food. We served a light lunch (chicken salad sandwiches, cherry tomatoes with mozzarella, that sort of thing). We were a little worried about doing a yogurt bar since we weren’t doing a brunch, but personally, I think it worked out great.
The yogurt bar included both strawberry and vanilla yogurt. We had granola, sweetened coconut flakes, and fruit as toppings. The fruit included blueberries, raspberries, blackberries, strawberries, and kiwi. We placed small, wide mouthed wine glasses next to the bar to be used as bowls, and then made sure everything else on the table was served in glass as well. The other desserts (brownies and lemon squares), sat next to the yogurt bar, and everyone was free to go there whenever they wanted (ie with their lunch or as the bride-to-be opened her presents).
♥
Trying to Enjoy with Toddlers
Truth be told, I thought everything wrapped together nicely, and I was very happy when it was over. Nothing went terribly wrong, Margeaux got some great gifts, and everyone seemed pleased. I did have the kids there, and that was a terrible idea. The whole set up was way too fancy for having the kids around and trying to help my mom run the party. If I’m learning anything about children, it’s that you really can’t expect to do what you did before. And throwing a party with china and glassware and grabby toddler hands just isn’t a good plan. Especially if there are people around you who forget that kids just make messes and that’s part of being around them.
My husband was there to watch them, but he felt out of place, and as much as he tried to keep the kids away from the party, people wanted to see them and let’s face it: Ginny loves attention.

We only have two (I say “only,” but two kids is so much harder than one), so I don’t know how parents do it who have a gang of ’em. I expect I’ll find out some day. But right now, Thomas and I together can usually do a pretty good job of keeping them in check when we both can give them a lot of attention (for example, Johnny and Margeaux’s wedding). I think this particular shower was difficult because I was stretched so thin between trying to help him when the kids were around the party, and trying to be a hostess for a really fancy party.
So lesson learned. When the husband can watch the kids and keep them at home, go with that plan. If I’m hosting a party and the kids are going to be there, ease up on the breakable stuff and go for a more casual décor. But I guess that’s what having kids is all about. You learn new lessons, build up fortitude, and exercise a level of patience you never knew you had.

Margeaux and Sisters | She had 2 | Now she has 7

Margeaux, welcome to the family of beautiful ladies!! We couldn’t attend your wedding
but are very thankful to Katy’s Sweetpea website sharing her pictures. We certainly
hope Johnny can bring you down to Florida to meet us sometime in the NEAR future.
We wish you two a happy, happy marriage.
Grandma Joan and Papajohn
LikeLike